Step 8 — Facilities Checklist
Step 8 of 11 — Facilities Checklist is the most comprehensive step. It documents every facility, amenity, and item present in the villa across 14 categories and 280 total items.
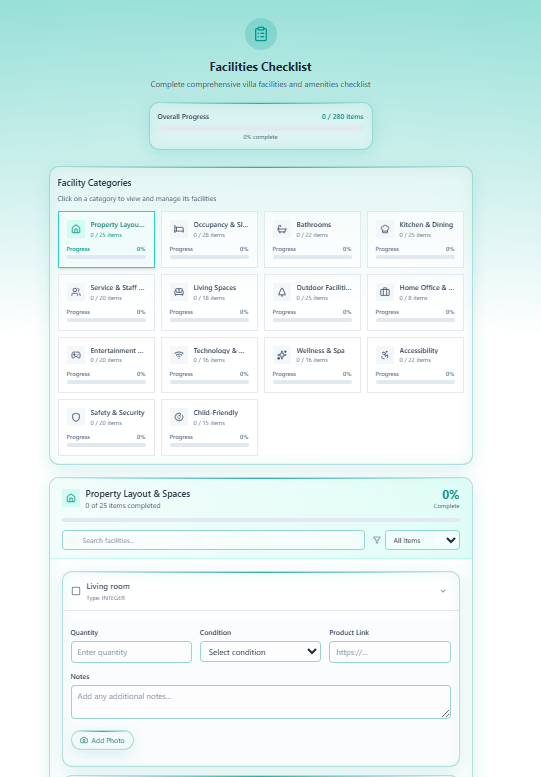
Overall Progress
Section titled “Overall Progress”A progress bar at the top tracks total completion:
Overall Progress 0 / 280 Items 0% completeFacility Categories
Section titled “Facility Categories”Click any category tile to expand it and start filling in items. Each shows its item count and current completion percentage.
| # | Category | Items |
|---|---|---|
| 1 | Property Layout & Spaces | 25 |
| 2 | Occupancy & Stay | 38 |
| 3 | Bathrooms | 22 |
| 4 | Kitchen & Dining | 25 |
| 5 | Service & Staff | 20 |
| 6 | Living Spaces | 18 |
| 7 | Outdoor Facilities | 25 |
| 8 | Home Office & Work | 8 |
| 9 | Entertainment | 20 |
| 10 | Technology & Connectivity | 16 |
| 11 | Wellness & Spa | 15 |
| 12 | Accessibility | 22 |
| 13 | Safety & Security | 20 |
| 14 | Child-Friendly | 15 |
| Total | 280 |
Filling in a Category
Section titled “Filling in a Category”When you click a category (e.g. Property Layout & Spaces), it expands to show all items. Each item has:
| Field | Description |
|---|---|
| Item name | The facility or amenity (e.g. Living room) |
| Type | Data type (e.g. INTEGER for quantity) |
| Quantity | How many of this item exist in the villa |
| Condition | Current state — select from dropdown (e.g. Good, Fair, Poor) |
| Product Link | URL to the product page if applicable |
| Notes | Any additional notes about this item |
| + Add Photo | Attach a photo of the specific item |
You can also use the Search facilities… bar and All Items filter to navigate large categories quickly.
Category Detail: Property Layout & Spaces (Example)
Section titled “Category Detail: Property Layout & Spaces (Example)”This category covers the physical spaces of the villa — rooms, living areas, outdoor zones. Example items include:
- Living room (quantity + condition)
- Bedrooms per floor
- Balconies / terraces
- Parking spaces
- Storage areas
- You do not need to complete all 280 items before proceeding — this step is optional
- Focus on the most important categories first: Property Layout, Bathrooms, Kitchen & Dining
- Use the Add Photo button on key items to document their condition
- Progress is saved automatically as you complete items
Navigation
Section titled “Navigation”| Control | Action |
|---|---|
| Previous | Return to Step 7 — Staff Configuration |
| Save Progress | Save without advancing |
| Next | Advance to Step 9 — Photo Upload |
Proceed to Step 9 — Photo Upload.